Title here
Summary here

This guide assumes you have a basic understanding of how Pionia Security works. If you are new to Pionia, you can start by going through the API Tutorial guide.
Our target is to create a simple authentication system using JWT. We will use the Firebase/JWT package to illustrate how to create a simple authentication system.
This authentication should be able to intercept every request and attempt to authenticate the user.
We need the Firebase/JWT package to create our authentication system. You can install the package via composer.
composer require firebase/php-jwtYou should have a database table called system_user with the following columns:
create table public.system_user
(
    first_name        varchar,
    last_name         varchar,
    password          varchar not null,
    email             varchar not null,
    username          varchar,
    role_code         varchar,
    created_at        timestamp default now(),
    last_logged_in_at timestamp,
    is_active         boolean   default false,
    id                bigserial
        constraint system_user_pk
            primary key
);
For this tutorial, we shall be using PostgreSQL as our database.
Pionia provides to Bootstrap our authentication backend using the Pionia CLI. You can run the following command to create the authentication backend.
php pionia gen:auth jwtThis will create the authentications folder if it doesn’t exist and create the jwt authentication backend in the same folder.
After this, you should have the following files in your authentications directory:
app
├──authentications/
    ├── JwtAuthenticationBackend.php
And the above class should look like this:
<?php

/**
 * This authentication backend is auto-generated from pionia cli.
 * Remember to register your backend in index.php.
 */

namespace application\authentications;

use Pionia\Core\Helpers\ContextUserObject;
use Pionia\Core\Interceptions\BaseAuthenticationBackend;
use Pionia\Request\Request;

class JwtAuthBackend extends BaseAuthenticationBackend
{
	/**
	 * Implement this method and return your 'ContextUserObject'. You can use Porm here too!
	 */
	public function authenticate(Request $request): ?ContextUserObject
	{
		$userObj = new ContextUserObject();

		# your logic here...

		return $userObj;
	}
}
Let’s first leave this file as it is and create a new file JwtUtility.php in the utils directory. We shall get back to it.
For separation of concerns, let’s create a utils directory where we shall drop all utility classes for our app.
Create a new file JwtUtility.php in the same utils directory.
app
├──utils/
    ├── JwtUtility.php
In the JwtUtility.php file, add the following code:
<?php

namespace application\utils;

use Exception;
use Firebase\JWT\JWT;
use Firebase\JWT\Key;
use Pionia\Core\Pionia;
use Pionia\Exceptions\UserUnauthenticatedException;
use Porm\Database\builders\Where;
use Porm\Porm;
use stdClass;

class JwtUtility
{
    /**
     * get the JWT settings from our settings.ini
     * */
    public function jwtSettings() : array
    {
        return pionia::getSetting('JWT');
    }

    /**
     * We grab a user from the database where either username or email is equivalent to the provided
     * If we don't want to return the password hash, we pass false as the second param
     * @throws Exception
     */
    public static function getUserByUsername(string $username, ?bool $withPassword = true): object
    {
        $columns = "*";

        // we define all the columns we need to return except the password hash
        if (!$withPassword) {
            $columns = [
                "id", "first_name", "last_name", "email", "username",
                "role_code", "created_at", "last_logged_in_at", "is_active"
            ];
        }

        $user = Porm::table("system_user")
            ->columns($columns)->get(Where::builder()->or(['email' => $username, 'username' => $username])->build());

        if (!$user){
            throw new UserUnauthenticatedException("User not found");
        }

        if (!$user->is_active){
            throw new UserUnauthenticatedException("User account is not active");
        }

        return $user;
    }

    /**
     * Generates the jwt token and updates the user's last login date
     * @throws Exception
     */
    public function generateToken(object $user): string
    {
        $expiresAt = $this->jwtSettings()['expires_at'];
        $secretKey = $this->jwtSettings()['secret_key'];

        $iat = time();
        $eat= $iat + $expiresAt;

        $payload = [
            "iss" => pionia::$name,
            "iat" => $iat,
            "exp" => $eat,
            "sub" => $user->username,
        ];

        $token = JWT::encode($payload, $secretKey, 'HS256');
        // if we have our token, we populate the last login time for this user
        if ($token) {
            Porm::table("system_user")
                ->update(['last_logged_in_at' => date("m/d/Y H:i:s", $iat)], $user->id);
        }
        return $token;
    }

    /**
     * Decodes any jwt token using our secret_key with a leeway of only 60 seconds
     * @param string $token
     * @return stdClass
     */
    public function decodeToken(string $token): stdClass
    {
        $key = $this->jwtSettings()['secret_key'];
        JWT::$leeway = 60; // 60 secs -- to cater for clock skew times between the signing and verifying servers
        return JWT::decode($token, new Key($key, 'HS256'));
    }

}We have a JwtUtility class that handles all our JWT logic.
getUserByUsername method fetches a user by username or email from the database. It also checks if the user is active. If the user is not found or not active, it throws an exception.
In normal circumstances, this method returns everything from the system_user table, including the password hash. However, if
$withPassword is set to false, it returns everything except the password hash. This is useful when you want to return the user object to the client.
jwtSettings method returns the JWT settings from the settings.ini file.
generateToken method generates a JWT token for the user. It fetches the user by username, generates a token, and updates the last login date in the database.
decodeToken method decodes the token and returns the decoded token.
We shall use this utility class in our JwtAuthenticationBackend.php file and in our login action.
In our JwtAuthenticationBackend.php in the authentications folder, replace the authenticate method with the following code:
    /**
     * Gets the authorization header from the request and authenticates with the provided token
     * If everything is okay, the context user is returned and Pionia will take over from here.
     * @throws Exception
     */
	public function authenticate(Request $request): ?ContextUserObject
	{
        $authorizationHeader = $request->headers->get("Authorization");

        if (!$authorizationHeader){
            return null;
        }

        $jwtUtility = new JwtUtility();
        $bearerKey = $jwtUtility->jwtSettings()['bearer_key'] ?? 'Bearer';

        // check if our token starts with the above key
        if (!str_starts_with($authorizationHeader, $bearerKey)){
            return null;
        }
        // grab the token alone removing the "Bearer " part
        $token = trim(str_replace($bearerKey, '', $authorizationHeader));

        $decoded = $jwtUtility->decodeToken($token);

        $username = $decoded->sub;

        $user =  $jwtUtility::getUserByUsername($username);
        // since we have our context user, we can populate them from here
        $contextUser = new ContextUserObject();
        $contextUser->user = $user;
        $contextUser->authenticated = true;
        $contextUser->authExtra["role"] = $user->role_code;
        // we have no permissions, so we ignore the permissions key
        return $contextUser;
}bearer_key from the settings.ini file. This is to make it easy to change the name of the Authorization header.bearer_key. If it does not, we return null and the request will proceed but
unauthenticated.ContextUserObject and decode the token. We then fetch the user by username and set the authenticated property to true and the user property to the user object we got from the database.ContextUserObject. This is what must be returned by the authenticate method.In our settings.ini file, add the following settings:
[JWT]
expires_at=3600
secret_key=yti87y2XMluYnUQQShUYApqmwkezWjzn
bearer_key=Bearer
Still in the settings.ini file, let’s register our Authentication Backend:
[authentications]
jwt=application\authentications\JwtAuthBackendIn our services directory, create a new file UserService.php. In normal circumstances, you should have the UserService class
already created for you. But if it’s not, you can create it in two ways. You can either create it manually or use the Pionia CLI to generate it for you.
Using the Pionia CLI:
php pionia gen:service userSelect Basic in the options provided by entering 1 or just hitting enter since it’s the default.
On the next action, you can write register,login to generate the register and login actions.
And you should have the new service created for you in the
servicesdirectory.
services/
├── UserService.php
However, I created mine manually, so what I have as login will be equivalent to your loginUser and register will be equivalent to your registerUser.
<?php

namespace application\services;


use application\authenticationBackends\JwtUtils;
use Exception;
use Pionia\Request\BaseRestService;
use Pionia\Response\BaseResponse;
use Porm\Porm;

class UserService extends BaseRestService
{
    /**
     * @throws Exception
     */
    public function login($data): BaseResponse
    {
        $this->requires(['username', 'password']);

        $username = $data['username'];
        $password = $data['password'];

        $jwtUtility = new JwtUtility();
        $user = $jwtUtility::getUserByUsername($username);

        $checkPassword = password_verify($password, $user->password);
        if (!$checkPassword) {
            throw new InvalidDataException("Wrong password");
        }
        $token = $jwtUtility->generateToken($user);
        return BaseResponse::JsonResponse(0, "Logged in successfully", ['token' => $token]);
    }

    /**
     * @param $data
     * @return BaseResponse
     * @throws Exception
     */
    public function register($data): BaseResponse
    {
        // user can't exceed here if any of these columns are provided
        // in the   request
        $this->requires(["first_name", "username", "last_name", "username",  "email", "password"]);

        $first_name = $data["first_name"];
        $last_name = $data["last_name"];
        $email = $data["email"];
        $password = $data["password"];
        $username = $data["username"];

        // if the user does not define a role, we set it to USER.
        // not cool for production
        $role_code = $data["role_code"] ?? 'USER';

        // data validation. User can't pass here if the following are invalid
        $this->asEmail($email);
        $this->asPassword($password);

        $hash = password_hash($password, PASSWORD_DEFAULT);

        // check if the email isn't taken
        $checkEmail = Porm::from("system_user")->has(['email' => $email]);
        if ($checkEmail) {
            throw new InvalidDataException("Email already exists");
        }
        // check if the username is taken
        $checkUsername = Porm::from("system_user")->has(['username' => $username]);
        if ($checkUsername) {
            throw new InvalidDataException("Username already exists");
        }

        $saved = null;

        // saving happens in a transaction
        Porm::from("")->inTransaction(function () use ($email, $hash, $first_name, $last_name, $role_code, $username, &$saved) {
            $saved = Porm::table("system_user")
                ->columns(["email", "first_name", "last_name", "role_code", "username", "is_active", "last_logged_in_at", "created_at"]) // we want to ignore the password field in data returned
                ->save(["email" => $email, "password" => $hash, "username" => $username, "role_code" => $role_code, "first_name" => $first_name, "last_name" => $last_name, "is_active" => true]); // let's just activate all profiles
        });

        if (!$saved){
            throw new InvalidDataException("Failed to create user");
        }

        return BaseResponse::JsonResponse(0, "User added successfully", $saved);
    }

}UserService class that extends BaseRestService. This class has two actions: login and register.login action, we require the username and password fields.
We then fetch the user by username and verify the password. If the password is correct, we generate a token and return it.register action, we require the username, password, email, first_name, and last_name fields.role_code to USER if it’s not provided.asEmail checks if we have a valid email and asPassword checks if the password passes
the minimum requirements(at least 1 special character, at least 1 capital letter, at least 1 digit, length of at least 8).We shall also need to register our UserService in the switch which shall handle henceforth all our requests.
Create a switch if it doesn’t exist in your switches directory. This can be created manually or using Pionia Cli
Using Pionia CLI
php pionia gen:switch v2You must target the version the switch is targeting, the above targets version 2 which can be accessed on /api/v2/.
The above command creates V2Switch.php in the switches directory.
You then have to register it in your routes.php file.
<?php

use Pionia\Core\Routing\PioniaRouter;

$router = new PioniaRouter();

$router->addSwitchFor("application\switches\MainApiSwitch") // by default targets v1 -- /api/v1/
    ->addSwitchFor("application\switches\V2Switch", "v2"); // that's the version we are targeting -- /api/v2/

return $router->getRoutes();
Under normal circumstances, the MainApiSwitch.php that ships with the template is enough!
switches/
├── MainApiSwitch.php
And add to your registerServices method in the MainApiSwitch.php file the following code:
class MainApiSwitch extends BaseApiServiceSwitch
{
    /**
     * Register your services here.
     *
     * @return array
     */
    public function registerServices(): array
    {
        return [
            'user' => UserService::class, // notice this here
        ];
    }
}To test our authentication, we shall use Postman. You can download Postman here.
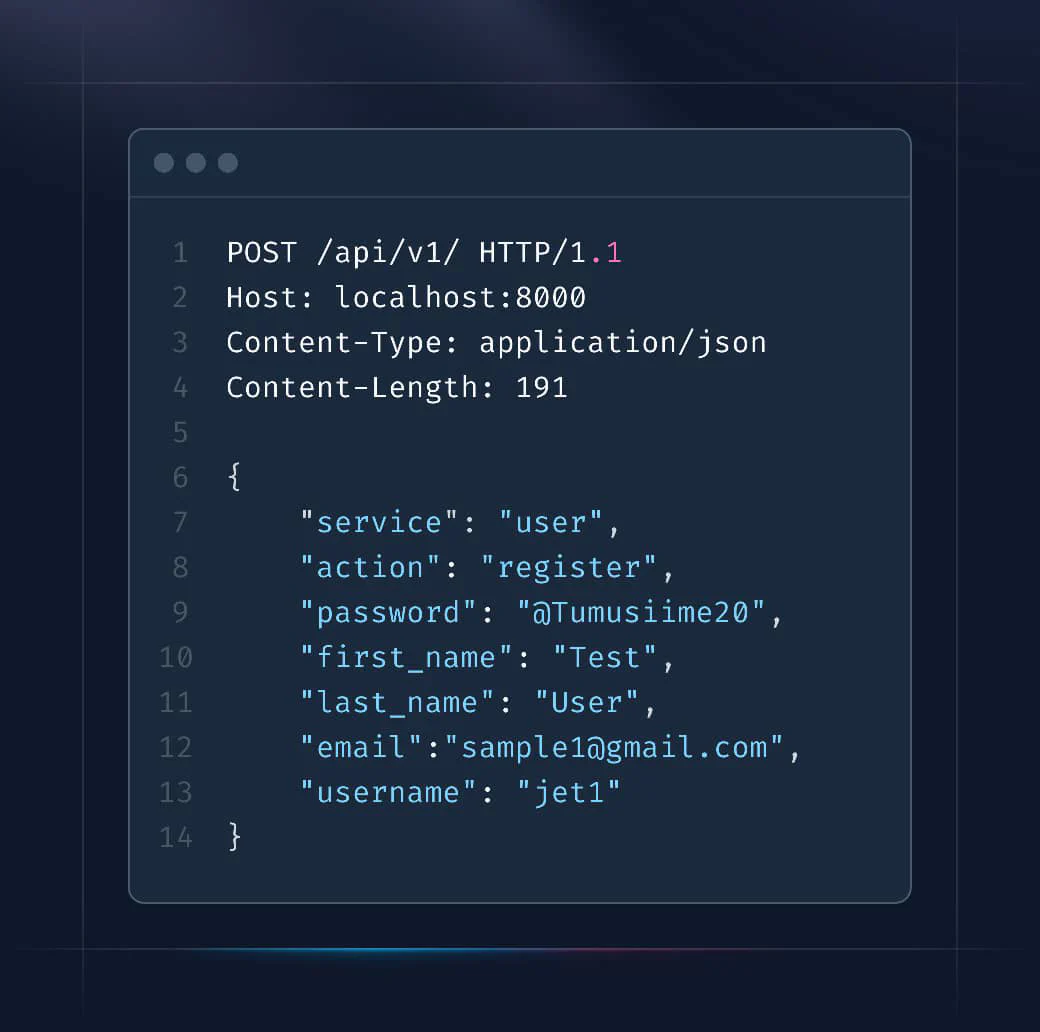
To register a user, send a POST request to http://localhost:8000/api/v1/ with the following JSON payload:
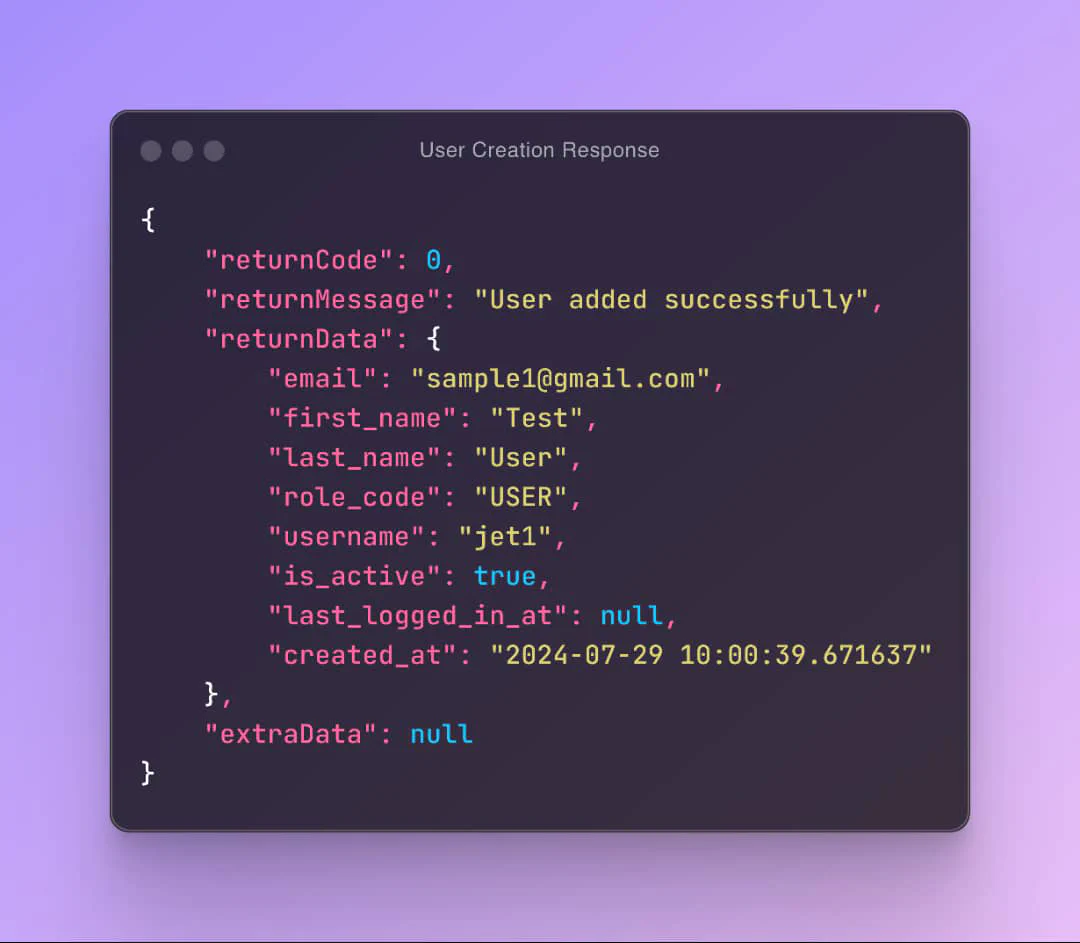
Making the above request, should return the following response.
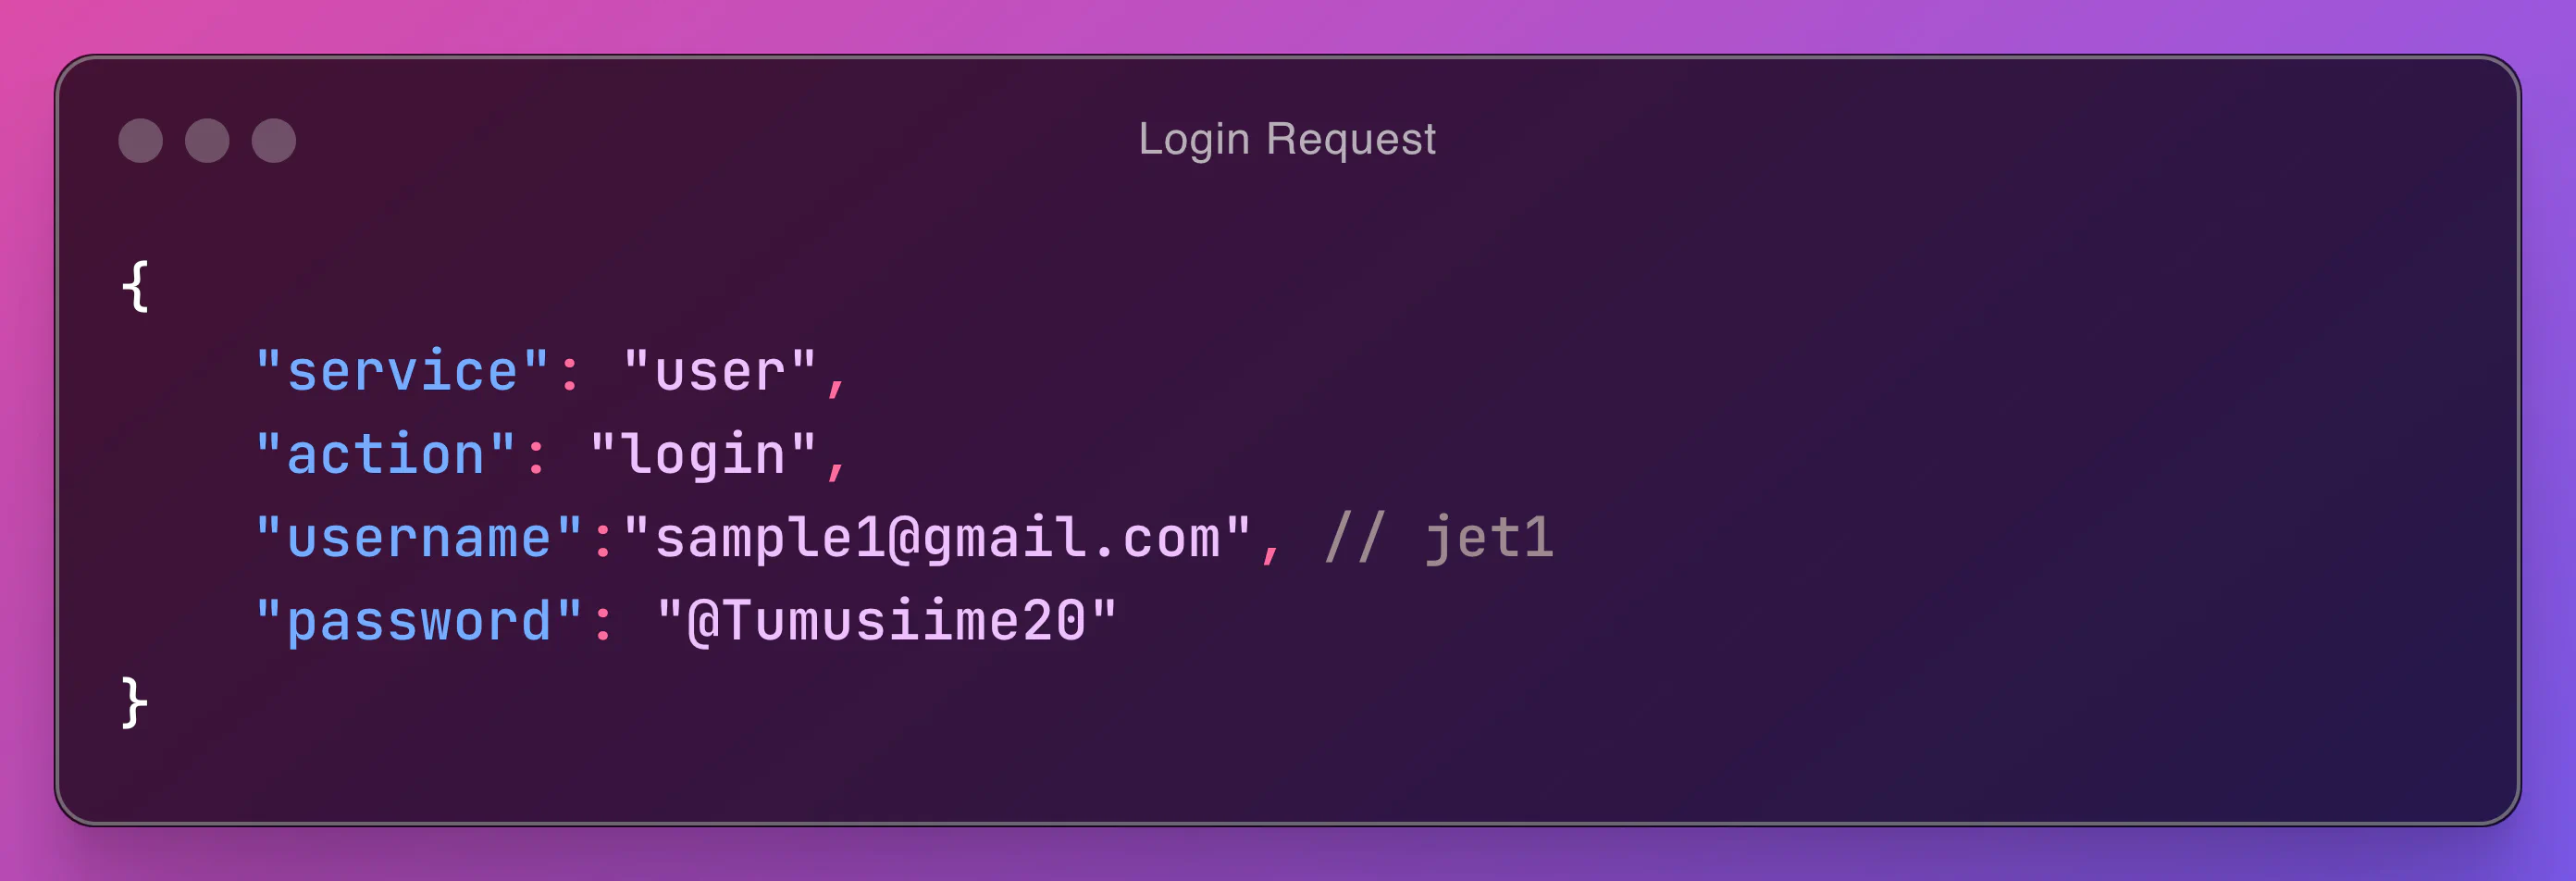
To test Login, send a POST request to http://localhost:8000/api/v1/ with the following JSON payload:
You should get a response with a token like below.
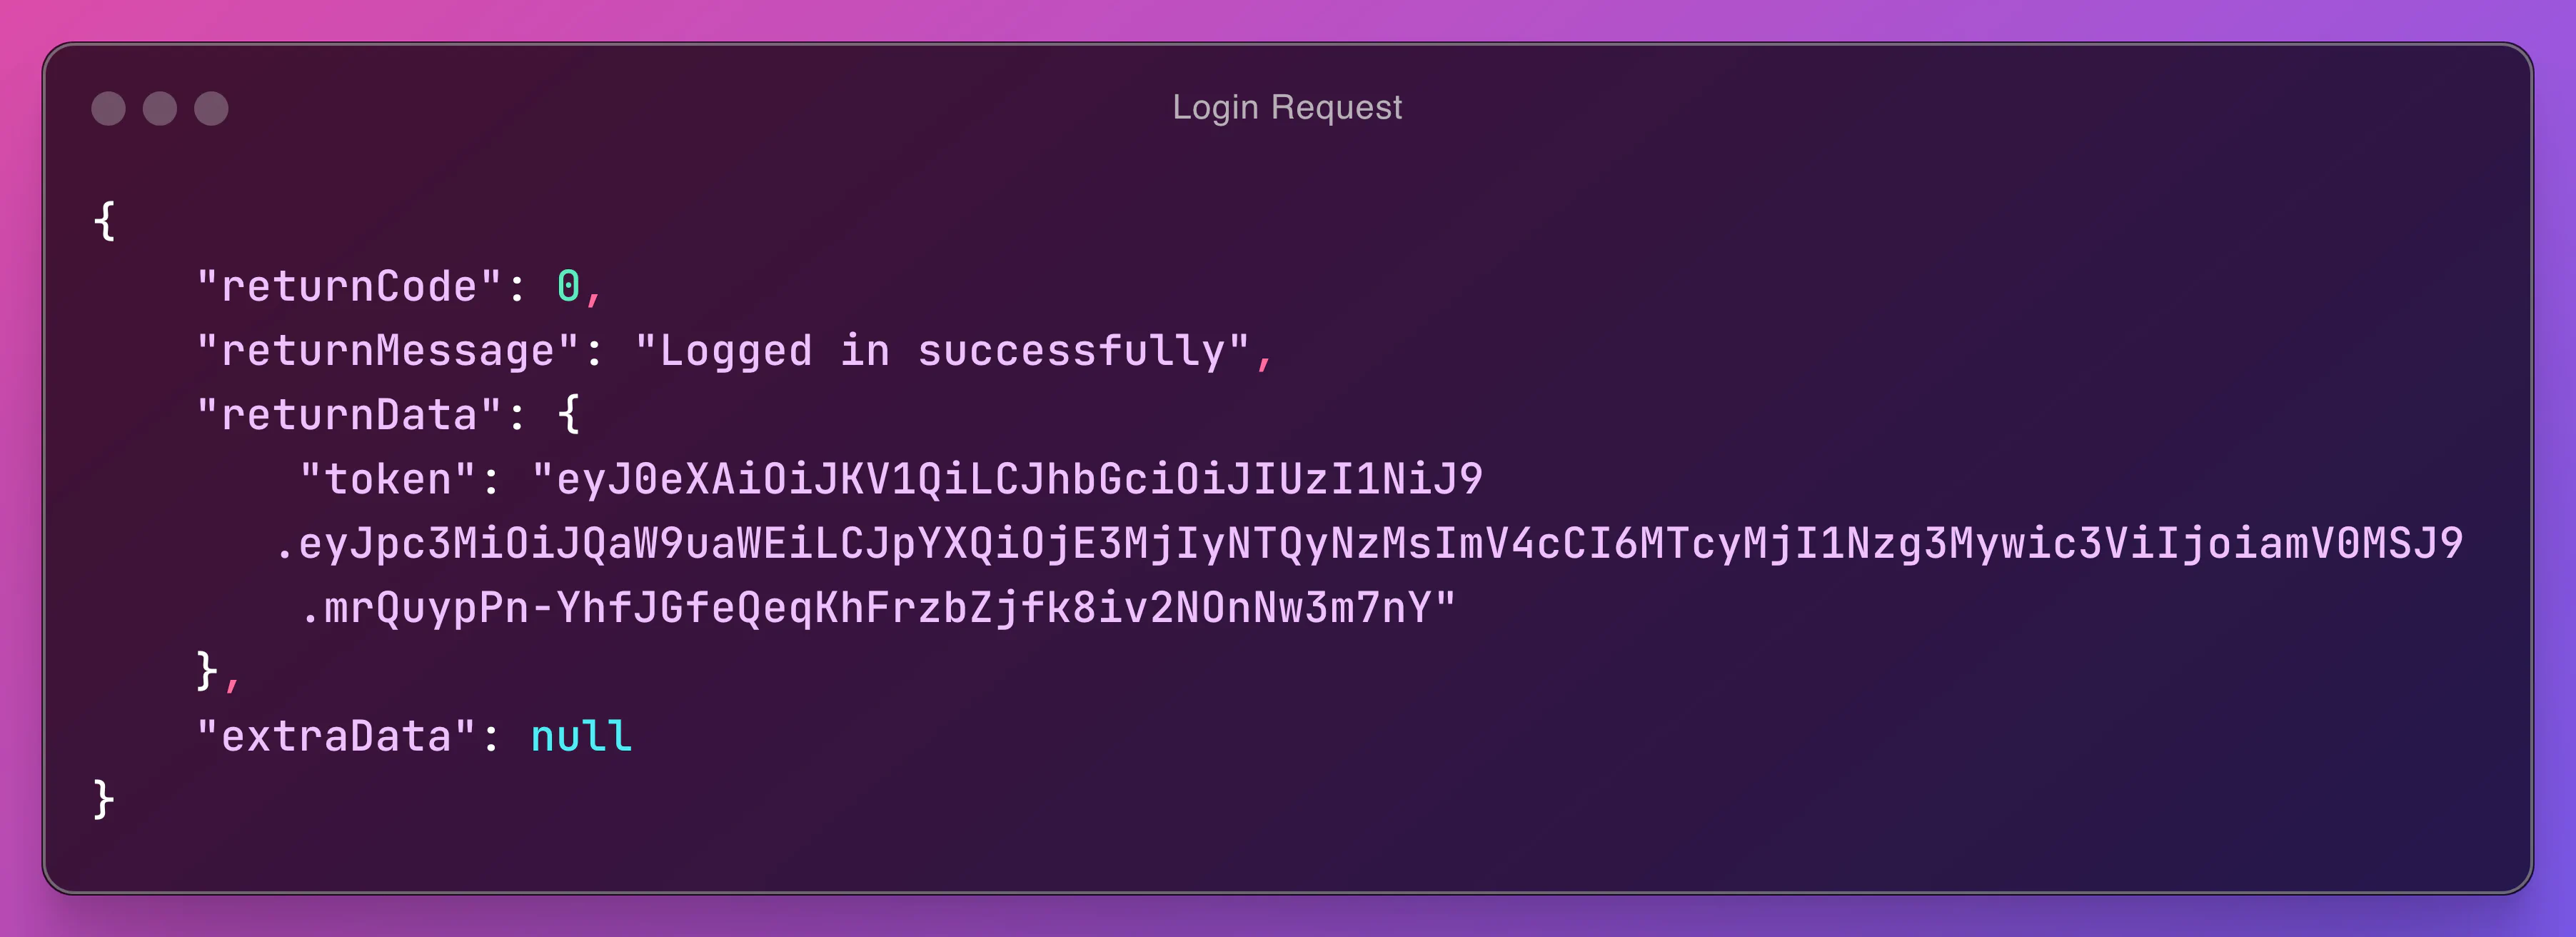
You can use this token to authenticate your requests.
So to test out that our authentication is working, we shall add another action called profile in our UserService.php file.
    /**
     * @throws UserUnauthenticatedException
     */
    public function profile(): BaseResponse
    {
        $this->mustAuthenticate(); // user can't pass here if they are not authenticated

        $user = $this->auth()->user;

        return BaseResponse::JsonResponse(0, null, $user);
}"POST" http://localhost:8000/api/v1/
{
"service": "user",
"action": "profile"
}{
"returnCode": 401,
"returnMessage": "You must be authenticated to access this resource",
"returnData": null,
"extraData": null
}Now let’s test the profile action with a token.
POST /api/v1/ HTTP/1.1
Host: localhost:8000
Content-Type: application/json
Authorization: Bearer eyJ0eXAiOiJKV1QiLCJhbGciOiJIUzI1NiJ9.eyJpc3MiOiJQaW9uaWEiLCJpYXQiOjE3MjIyNTQ3MjIsImV4cCI6MTcyMjI1ODMyMiwic3ViIjoiamV0MSJ9.8gzQNbPR74RqAFa6HxFhFGMv904ow2Ux5Eq_yKRcVz8
Content-Length: 50
{
  "service": "user",
  "action": "profile"
}{
"returnCode": 0,
"returnMessage": null,
"returnData": {
"first_name": "Test",
"last_name": "User",
"password": "$2y$10$obbGcRTCDgV31K5k2KMW8.8hkXy6Enh3K9l9JHRpgsTmfwlXVgScy",
"email": "sample1@gmail.com",
"username": "jet1",
"role_code": "USER",
"created_at": "2024-07-29 10:00:39.671637",
"last_logged_in_at": "2024-07-29 12:05:22",
"is_active": true,
"id": 3
},
"extraData": null
}We can remove the above password hash just to clean up further.
In our authentication backend, let’s change the following line highlighted and add false as the second parameter to the getUserByUsername method.
23    public function authenticate(Request $request): ?ContextUserObject
24	{
25        $authorizationHeader = $request->headers->get("Authorization");
26
27        if (!$authorizationHeader){
28            return null;
29        }
30
31        $jwtUtility = new JwtUtility();
32        $bearerKey = $jwtUtility->jwtSettings()['bearer_key'] ?? 'Bearer';
33
34        // check if our token starts with the above key
35        if (!str_starts_with($authorizationHeader, $bearerKey)){
36            return null;
37        }
38        // grab the token alone removing the "Bearer " part
39        $token = trim(str_replace($bearerKey, '', $authorizationHeader));
40
41        $decoded = $jwtUtility->decodeToken($token);
42
43        $username = $decoded->sub;
44
45        $user =  $jwtUtility::getUserByUsername($username, false);
46        // since we have our context user, we can populate them from here
47        $contextUser = new ContextUserObject();
48        $contextUser->user = $user;
49        $contextUser->authenticated = true;
50        $contextUser->authExtra["role"] = $user->role_code;
51        // we have no permissions, so we ignore the permissions key
52        return $contextUser;
53 }This is a simple way to create an authentication system using JWT in Pionia. You can extend this to include more features like password reset, email verification, etc. You can also use other JWT libraries like lcobucci/jwt or spomky-labs/jose if you prefer.
Remember to always hash your passwords before saving them to the database. You can use the password_hash function in PHP.